
Links
Linking to internal files, external sites and email addresses all use the a tag and its href attribute. Linking to an external site must always use an absolute address,
for example: <a href=”http://google.com”>google</a>
Linking to an email address is similar, but the mailto: property is added,
for example: <a href=”mailto:ames@rmu.edu”>Andrew Ames</a>
Linking to internal files require a relative address and close attention to file management must be paid. For example to link to another file my HTML would look like this
<a href=”someotherfile.html”>some other file on my site</a> and require that the files being linked be in the same folder.
Images
Linking to images is similar to linking to files, they can be linked absolutely or relatively, however, they use the img tag and the src, width, height and alt attributes. For example a photo linked realativly would look like this: <img src=”yourphoto.jpg” height=”100″ width=”100″ alt=”this is a photo of me”/> note that the img tag does not have a closing tag.
Document types and Character sets
As there are now 5 versions of HTML, you want to set your document type so browsers know what version you are using. We will be using HTML 5 in the class so each of your documents should now start with :
<!doctype html> This comes directly before the <html> tag
It is also important to note, web pages can be done in a number of languages, so a character set should be set as well. We will be using the western standard UTF-8. This is set using a meta tag inside the head.
<head>
<meta charset=”UTF-8″>
<title> page title </title>
</head>
CSS basics
To make your HTML look good we need Cascading Style Sheets, CSS. With CSS we tell our HTML tags how we would like them to look using rules. CSS rules are made up of Selectors and at least one Declaration. Declarations are made up of one property and its values.
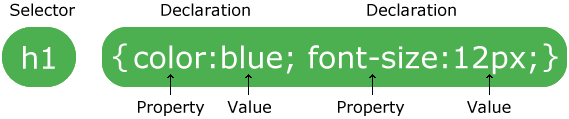
A Selector can be any HTML element. For example if you wish to style your Paragraph <p></p> you’d simply start with p then place your declarations between curly brackets { }.
Declarations define how things look through various properties like font, color, width, margin, boarder, etc. So to continue our example, if we wanted to style our paragraph by making the font arial, 12point and grey that is double spaced our rule would look like this:
p {font-family:Arial; font-size:12pt; color:#666666; line-height:24pt;}
In-class: Continue work on your homepage and complete the following:
- Edit bio for spelling and grammar
- Add links to your email address and influences and top 5 sites
- Add a link to the 1st mini project
- Add a photo of yourself
- Add CSS to style backgrounds, colors, margins and the fonts of the HTML tags you have already used.
- Upload changes and photo to the server, if not completed in class have posted before the start of class 3.
Mini Project: Style the miniproject.html (which is in my pass outs folder) file by adding CSS. Give it an aesthetically pleasing look and increase its legibility by applying basic design principles. Be sure to include a doc type and character set to avoid strange characters from appearing. Style the body, paragraphs, lists and headings with a minimum of 7 declarations for each selector. Upload to the server and be sure to add a link to your project on your home page.
Read: The Principles of Beautiful Web Design: Chapter 1: Layout and Composition